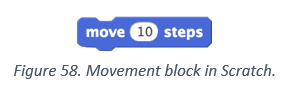
We have been working with sounds, and now we are going to look at how to move the cat in Scratch. In Scratch, one way I can move the cat is picking him up with my mouse. I can click and hold the mouse down and then let go wherever I want him to stay. That is one way to move the cat. Another thing I can do is to use blocks like the one below to make the cat move 10 pixels.
The cat in Scratch has a secret. Not only can he move, but he is also carrying a pen.
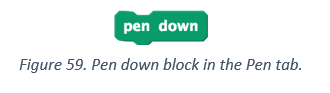
In the Pen tab, you can tell the cat to put the pen down and what that means is, whenever he moves, he is going to draw a line. Similarly, the pen up block make him stop drawing the line while moving. We can use this to draw cool pictures. Let us start and draw a square. First, we want a Reset Script. It is going to be helpful to be able to clear the screen, pick the pen up, move the cat back to the center, have it go to 0, 0.
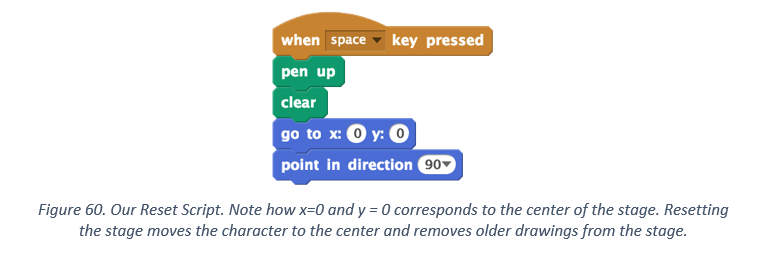
The cat will do all this when I press the Space key. Now we can move him and when we press Space, the cat clears the stage and moves back to the center. Try to play with different choices of x and y and see where cat ends up as a result.
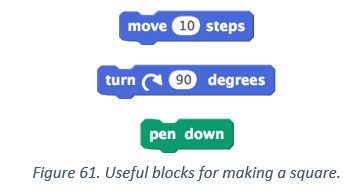
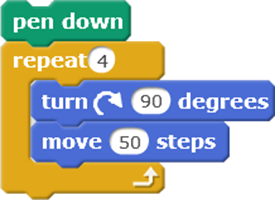
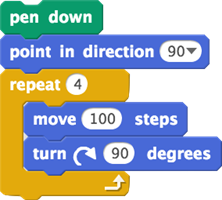
Now, let us draw a square. We can start with Move 100 for one of the sides and then turn 90 degrees for one of the corners. We need to do this four times. We can use either repeat or duplicate. The full instruction go something like move, turn, move, turn, move, turn, move, turn and we have the four sides of a square. Before looking up the solution in the next page, try to see if you can make the square yourself!
You might want to make your character smaller so that it is easier to see where it is drawing (check out the 4 buttons at the top right of the stage -- stamp, scissor, and 2 buttons with arrows--these could be helpful!). In order to make the square you will find the following blocks helpful.
If you choose to use the repeat block, then one possible solution is the following script.
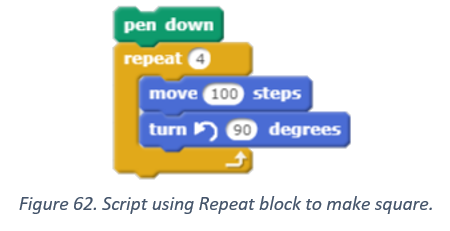
Imagine if now we wanted to increase the size of the square. If we have made the square without repeat, then we would need to change the move 100 steps to the new size in four different places. Using repeat block means that we only need to change the move steps in a single block. The repeat block helps us save time and avoid errors as a result of fewer changes to be made.
Let us briefly look at Set Color in Scratch using the  block. To change the color selected in this block, first click on the color square and then point and click on any area in the screen with the color you want to choose. Just like Set Pen Color, we can also use Set Pen Size. Try experimenting with these different Set and Change Blocks. For example, look what happens if we put a Change Block inside of a Repeat Block.
What could happen if you do not use a repeat to draw a square? Check all that apply.
- You might use more lines of code.
- You might use fewer lines of code.
- You might have to change the script in fewer places to change the size.
- You might have to change the script in more places to change the size.
- You might make a mistake by forgetting to change one part of the script.
8.1 Drawing a Triangle
In this section, we work through a list of questions to understand how to make a triangle in Scratch. Feel free to experiment by running different Scripts in Scratch to answer the questions.
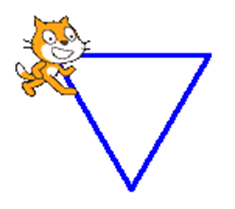
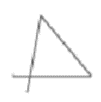
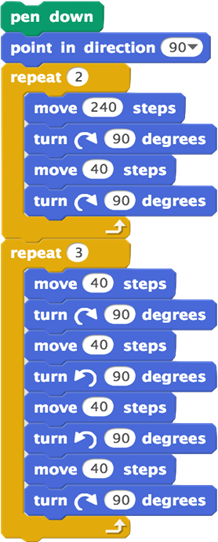
- Someone wants to draw a triangle in Scratch, like the one below. At each turn, does the character turn more or less than 90 degrees? The sprite will be turning to the right.
- - More than 90 degrees
- - 90 degrees exactly
- - Less than 90 degrees
- Someone tried to make a triangle but it does not quite look like a triangle. Would you recommend that they have the character turn MORE at each turn or LESS at each turn?
- - More
- - Less
- Someone tried to make a triangle but it does not quite look like a triangle. Would you recommend that they have the character turn MORE at each turn or LESS at each turn?
- - More
- - Less
8.1.1 Guess and Check
Guess and Check is a REALLY important debugging strategy in any programming language, including Scratch! Pay close attention because you will be using this debugging strategy a lot! Computer programs never work the first time you write and execute them. They always have bugs in them. So learning how to debug is really important for computer science. We are going to teach you a debugging skill called Guess and Check.
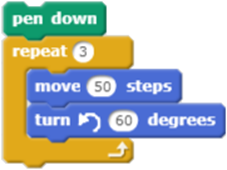
We shall try to make a triangle. Point the cat to the right – that is 90 degrees. Put the pen down and then repeat three times, because the triangle has three sides. On each side, move 50 steps and then turn 60 degrees resulting in the following script.
So, let us see what that draw first.
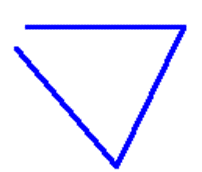
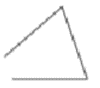
That does not look a lot like a triangle. Let us try something else. We can safely reason that the angle is wrong, so let us try a different angle, say 90 degrees, which results in the following image.
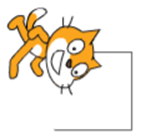
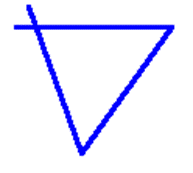
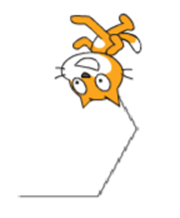
That looks more like a square, which makes sense since we turned 90 degrees each time. It looks like we still need to turn more. Let us try something much bigger, let us say 150 degrees, which results in the following image.
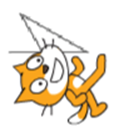
It has a triangle in there, but that is not exactly what we wanted. We want the lines to match up at the end. We can try just 130 degrees and that results in the following image (now without the cat).
We certainly seem to me getting closer, so let us turn less this time, perhaps 110 degrees, which results in the following image.
It looks good, but now the edges do not close. We have narrowed our range quite a bit though, in between 110 and 130 degrees. Let us try 120 degrees.

Finally, it looks perfect. We have figured out that the turn should be 120 degrees. The previous example were not correct, but they were useful in actually finding the right answer. We were able to keep track of what options we have already tried and which ones are closer to the expected final solution. This process of arriving at the correct solution by making small changes and checking the result allows us to solve tough problems by breaking down the solution process.
What are reasons that you might want to make a copy of your script before guessing a new value?
Check all that apply
- It can help you keep track of what other values you have tried.
- Once you make a script, you cannot change it.
- If you accidentally mess up the copy of the script, you can still use your old version.
When you guess and check, what might not work? Check all that apply.
- Looking at what your program does with each value.
- Change values randomly.
- Changing multiple parts of the script at the same time.
8.1.2 Practice Running Code
Consider the following two scripts to draw a square.
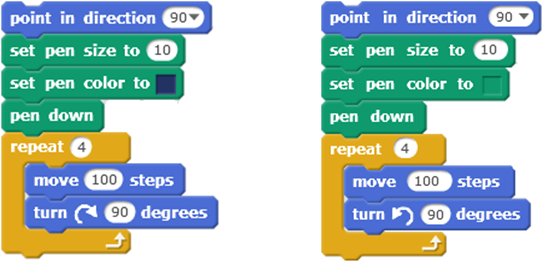
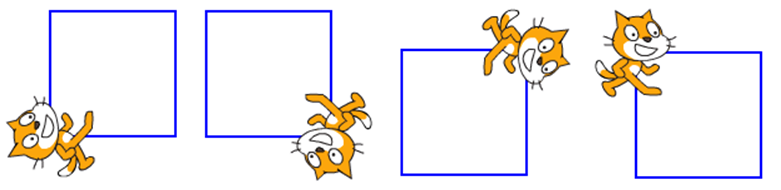
One on the left turns 90 degrees right each time and the one here turns left 90 degrees each time. So the question is do these two do the same thing? They both draw squares, but they are going to draw them in slightly different positions. So that we can tell the difference between the two, they both draw in a different color. You can choose any two colors you prefer. Both the scripts draw squares exactly the same size because they both move the same number of steps.
Let us watch the process in slow motion. To achieve this, we can to put a  in between the move 100 steps and turn 90 degrees. This way, as the cat goes through, it will move and then wait for one second and then turn and then wait for one second and so on. Now, we can notice that in one script the cat always turns right and in the second script it always turns left. Something to notice, too, is that on both of them, they end up facing in the exact same direction that they started. So sometimes, it does not matter which way we turn because we just want to draw a particular shape. In some other cases, it really matters whether we want the box coming down from where the cat currently is or coming up from where the cat currently is.
-
If you have made a script to draw a triangle by turning right 120 degrees at each corner, what will happen if you change the script to turn left 120 degrees at each corner?
- The script will no longer draw a triangle
- The script will draw a triangle in a different location
- The script will draw a bigger triangle
- How many degrees did the sprite turn in total when it drew the square?
- How many degrees did the sprite turn in total when it drew the triangle?
Sometimes finding bugs in code can become a challenging task as shown in the graph below.

8.2 Drawing a Pentagon
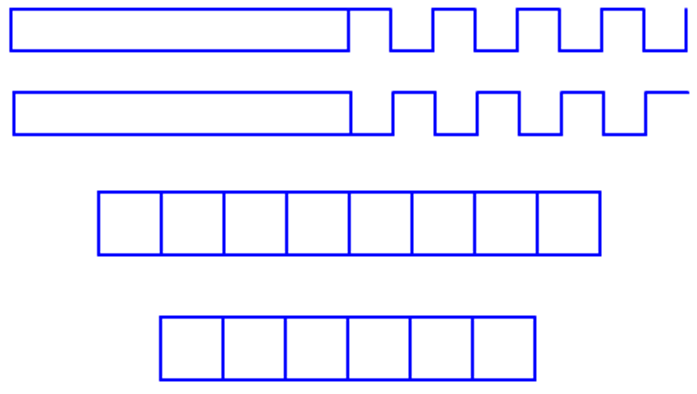
Use Guess and Check to draw a pentagon in Scratch, as shown in the picture below.
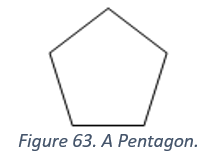
How many degrees did the character turn in total when it drew the pentagon?
Calculating Turns Using Division
Note that we turn a total of 360 degrees, regardless of whether we are drawing a triangle, square or pentagon! We can use this information to determine a method for drawing a shape with any number of sides.
In order to draw a triangle, we turn 120 degrees three times for a total of 360 degrees. For a square, we turn 90 degree four times for a total of 360 degree. Similarly, for a pentagon, we turn 72 degrees five times for a total of 360 degrees. So, for a hexagon (six sided shape), in order to figure out how many turns we need to turn, we divide 360 by 6 to obtain 60 degrees. Rather than using and check, now we have informed choice based on mathematics. Using this method, we can build an octagon (8 sides) and even a circle.
Use the division method to draw an Octagon in Scratch.
- How many degrees do we need to turn at each corner to make an Octagon?
- How many degrees do we need to turn at each corner to make a Hexagon?
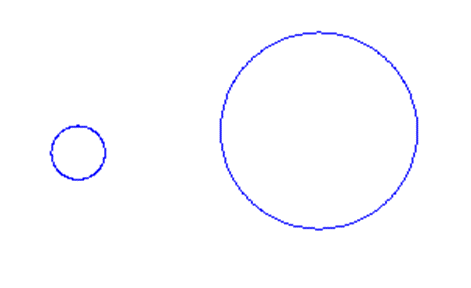
- Draw a circle in Scratch. How many degrees will the character turn in total when it draws the circle?
- Building off the circle you just made, draw two more circles. One should be smaller than the first circle and one should be larger than the first circle you drew.

8.3 Degrees, Directions and Coordinates
Words like up or right are perfectly understood as directions by humans. Computers need a number to indicate an exact direction. All sprites in Scratch have their own direction number. The direction numbers are between −180 and 180 degrees. Pointing at 0 degrees is facing up. Pointing at 90 degrees is facing to the right. The following figure shows several directions and their degrees. Notice that the degrees increase in the clockwise direction and decrease in the counterclockwise direction. Also, notice that −180 and 180 degrees point in the same direction: down.

How does Scratch know how to always make the Sprite appear in the the center of the stage? How does Sprite calculate the steps and move if we program it to move 100 steps forward or backwards? To make the Sprite move around the Stage, Scratch uses coordinates. Coordinates are numbers that represent an exact location. Move your cursor on the stage and you will see a number written with x and y changing at the bottom as you move the cursor.
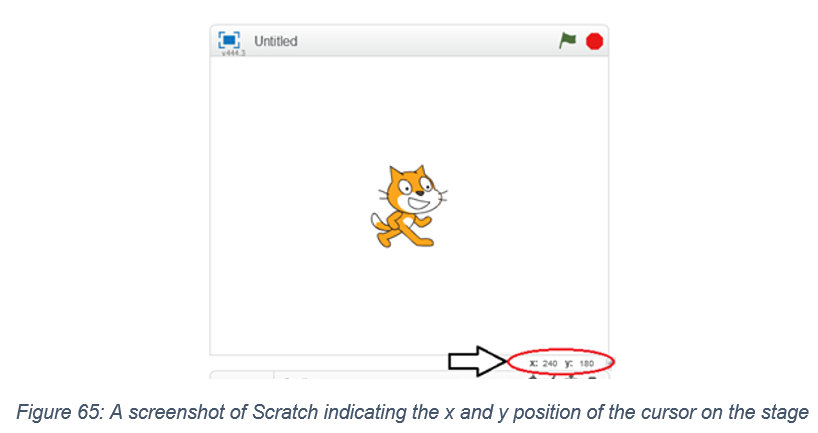
The x-coordinate (also called x position) is a number that represents how far left or right a sprite is on the Stage. In other words, x is the sprite’s horizontal position. The y-coordinate (also called y position) is a number that represents how far up or down a sprite is on the Stage. The y-coordinate is a sprite’s vertical position. Used together, x- and y- coordinates indicate a sprite’s precise location on the Stage. When writing coordinates, the x-coordinate always comes first, and a comma separates the coordinates. For example, an x- coordinate of 42 and a y- coordinate of 100 would look like this: (42, 100). In the very center of the Stage is a point marked (0, 0) which is called the origin.
As you move the cursor to the right, the x number gets bigger. As you move the cursor up, the y number gets bigger. As you move the cursor to the left, the x value gets lower and lower until it goes to 0 at the origin. If you continue to the left of the origin, the x number becomes negative and it goes to bigger and bigger negative numbers. Same thing happens with the y value, as you go down, you go into smaller y values. These x and y values are called coordinates of a point.
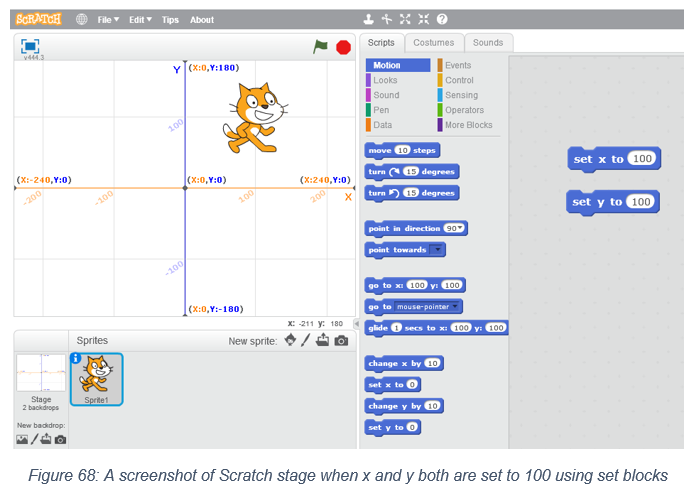
Scratch also has a background that makes it easier to visualize the x and y-axis. You can change the background from the “New Backdrop” option in the left below the stage. Click on the Choose the Background from the Library. Select Other under Category, and from here choose the xy-grid. Selecting the grid background makes the Stage look similar to Figure 62. We have added several cat sprites at different x and y-coordinates.

The rightmost side of the Stage has an x-coordinate of 240. The leftmost side of the Stage has an x-coordinate of −240. The y-coordinates work the same way: the top of the Stage has a y-coordinate of 180 and the bottom is −180. The mouse cursor’s x- and y-coordinates are shown in the bottom-right corner of the Stage. In the previous figure, the mouse cursor is at the coordinates (−182, −27), which means the x-coordinate is −182 and the y-coordinate is −27. So we understand that the x and y values tell us about position of a sprite in reference to the origin.
8.3.1 Moving Negative Steps
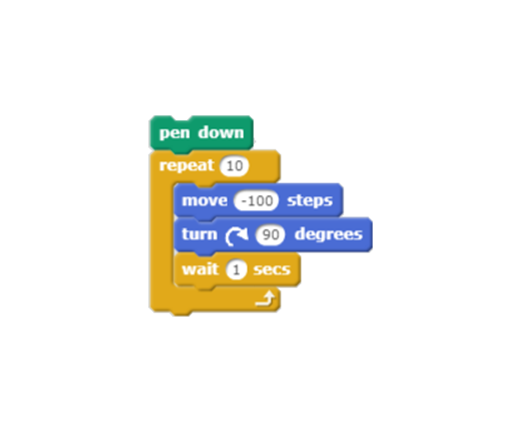
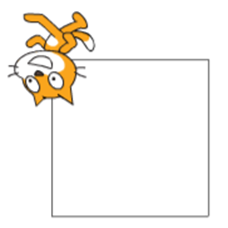
What happens when you move −100 steps instead of 100 steps? What happens if you use negative numbers when you are drawing a square? Check it out! We look at negative numbers, and in particular, what happens when we move a negative number of steps. We want to have the cat move maybe 100 steps. So let us click on that and see what happens. He moves, but he does not draw a line. What are we forgetting…? "Pen down." Ok, now the question is what would happen if instead of moving 100 steps, we moved negative 100 steps? Can you picture what the cat would do? Go ahead – try it! The answer is he moves backwards. Let us see if we can draw a square using negative 100 steps. We do our normal thing; pen down, move negative 100 steps, turn right 90 degrees. Does this work?
The square works, but something tricky is that now the cat faces to the left. If we have him move forward 100 steps, he will move to the left.
Try this again, but this time after resetting the screen guess the direction of turn and motion before it happens. Experiment until you understand how the direction that cat points in, relates with its direction of motion.
8.3.2 Negative Steps Excercise
Negative Steps Excercise
-
If you want the sprite to move in the same direction it is facing, which block should you use?

-
If you want the sprite to move in the opposite direction it is facing, which block should you use?

-
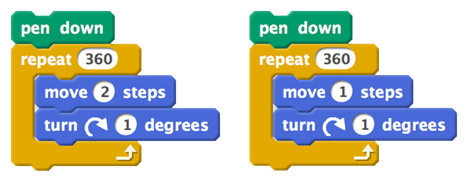
Which of these scripts will draw a larger circle?
-
Will the two scripts from the last question draw circles with the same perimeter? Hint: You can calculate the perimeter of a circle by multiplying the total number of times you repeat by the number of steps you move during each step!
8.3.3 Set and Change with X and Y Position
We have used set and change with variables and tempo. Now we are going to use set and change with x and y-coordinates.
We have x and y-axis grid up as the stage, and we know that we can move 10 steps and get the Sprite to move along
using the block  and it just moves in whatever direction it is facing. Let us try some set blocks.

We can set x to be 0 so that sprite jumps back to the center. We can also set y to be 0, or set x to be 100 and y to be 100 and the sprite ends up right at the point where x and y are 100 both on the grid.
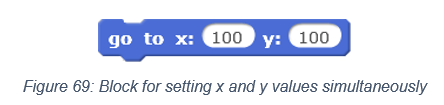
There is another set block the combines setting x and y at the same time. This block does not say “set” rather it says “go to”. It ignores any previous values of x and y and sets them to the new values given in the block.
We also have a third block that is similar to set block, called “Glide”. Glide sets the x and y position, but it takes some time to get there. For example, it will take one second to go to x equals 100, y equals 100 for the command block in Figure 66. Try it!

Finally, we note the change blocks. If we change x by 10, it will move the sprite in the horizontal direction by 10. Note how rather than setting the x value to 10, it modifies the existing value by 10.

Remember that set always ignores the current value and sets it to a specific value, and change will either add or subtract from the current value. Try the change block with different values of x and y to see how the sprite moves. You can make it dance along the axis using change and repeat blocks together. Try it out!
8.3.4 Cordinates Excercise
As you move right, the X-value gets
- Bigger
- Smaller
- Stays the same
As you move left, the X-value gets
- Bigger
- Smaller
- Stays the same
As you move up in Scratch, the Y-value gets
- Bigger
- Smaller
- Stays the same
As you move down in Scratch, the Y-value gets
- Bigger
- Smaller
- Stays the same
As you move up in Scratch, the X-value gets
- Bigger
- Smaller
- Stays the same
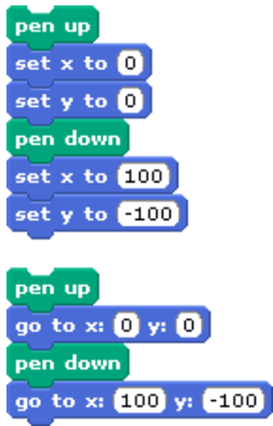
Will these two scripts do the same thing? Answer this first before trying it in Scratch!
- Yes
- No
We can draw a picture using this block:
 Try making a picture of a house like the one described below.
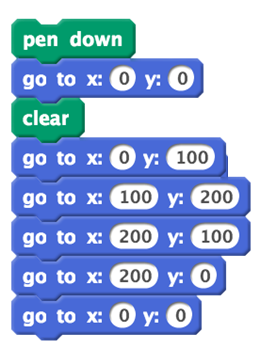
- Yes
- No
8.4 Drawing Excercise
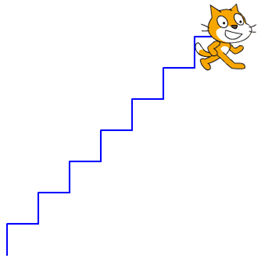
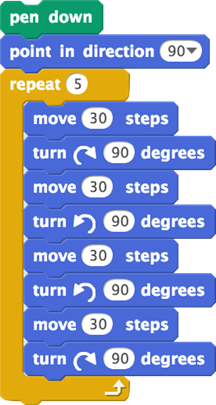
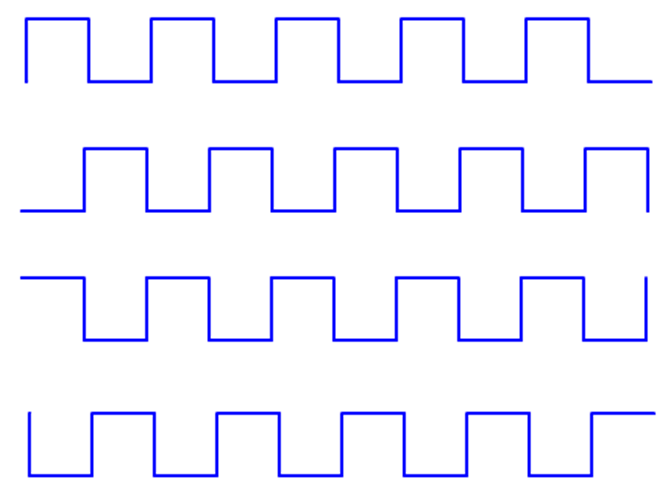
- Draw a staircase across the Scratch stage, using repeat.
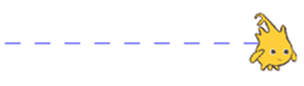
- Draw a dotted line that goes across your Scratch screen. Hint: You should use repeat.
- Assume the sprite starts at the arrow in Figure 58, facing the same direction as the arrow. Choose which path the sprite will follow when this script executes.
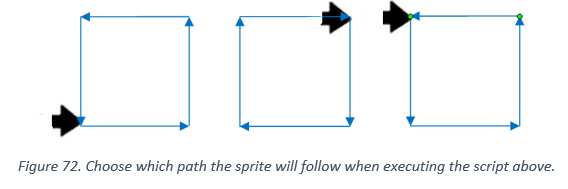
In the script, which way is the sprite facing right before it starts moving (before it takes the first 0.5 step)? Note: to help you answer this question here is what the angle commands mean in Scratch.
Scratch angle commands, (0 is Up, 90 is Right, 180 is Down, -90 is Left).
- Left
- Right
- Up
- Down
The script draws a sequence of half-circles. Which of the images below does the script draw? Hint: Think about which way the sprite is facing when the script starts drawing.

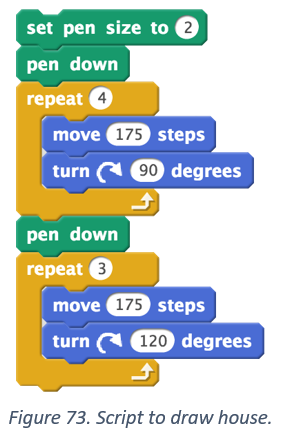
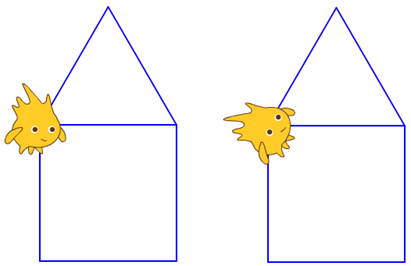
- You want to draw a picture of house with a square on the bottom and a triangle on top. You wrote the script, which part of the script draws the square?
- The top repeat
- The bottom repeat
- Which part of the script draws the triangle?
- The top repeat
- The bottom repeat
The script above draws the image below. Why is the triangle not on top of the square?
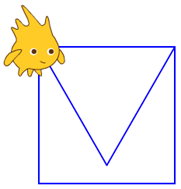
- Because the blocks inside the second repeat block are in the wrong order.
- Because the sprite is facing the wrong direction after the first repeat block.
- Because the sprite is turning 120 degrees at each corner instead of 60 degrees.
Having multiple solutions to the same problem is common in computer science! You came up with two different ways to solve this problem. Which line of the two solutions is different from the original solution? Give the line numbers
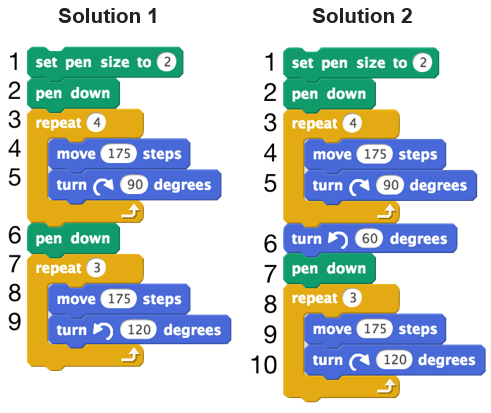
After each of these scripts run, one solution makes the character face right (Picture A) and the other makes the character face toward the top of the roof (Picture B).
- Which picture does Solution 1 produce?
- Picture A
- Picture B
- Which picture does Solution 2 produce?
- Picture A
- Picture B
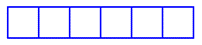
You want to draw a series of squares like the one below. We are going to look at two ways to make a row of squares like this.
This first method is in the script below.
This script draws the shape below!

- After the script runs, which way does the cat end up facing?
- left
- Right
- Up
- Down
- Which of the following does the script draw?

- After the script runs, which way does the cat end up facing?
- left
- Right
- Up
- Down
- Which of the following does the script draw?
- After the script runs, which way does the cat end up facing?
- left
- Right
- Up
- Down
- Which of the following does the script draw?
- After the script runs, which way does the cat end up facing?
- left
- Right
- Up
- Down
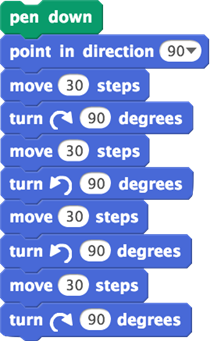
- Let us try another method for drawing a series of squares.
If the cat starts in the top left corner, which way is it facing when the script finishes?
What will the cat draw after this script runs?
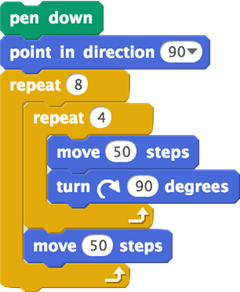
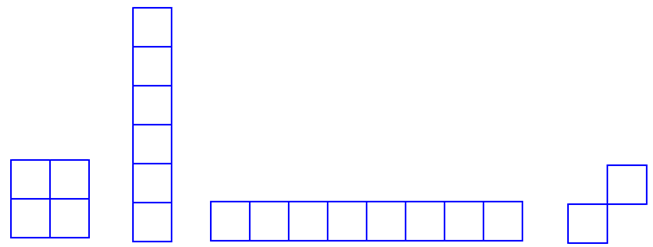
We want to change this script to make the spaced-out blocks below.

Which new block will be most useful to add to the original program to draw the spaced-out blocks?

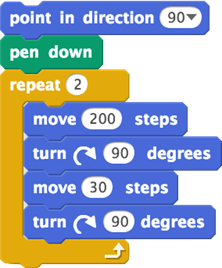
Which combination of the following changes to the script will make it produce the correct drawing? Select all that apply. (Note: The correct answer to this question is only one of the many scripts that would draw the desired image correctly.)
- Move the "pen down" block inside the "repeat 8" block and before the "repeat 4" block.
- Move the "pen down" block inside the "repeat 4" block and after the first "move" block.
- Put a "pen up" block inside the "repeat 4" block and before the first "move" block.
- Put a "pen up" block inside the "repeat 8" block and before the second "move" block.
- Change the first "move" block from the original script to say "move 60 steps" instead of "move 50 steps".
- Change the second "move" block from the original script to say "move 60 steps" instead of "move 50 steps".
The next two problems are about the same Scratch script below
